


An automated login system utilizing the IndusBoard Coin includes establishing the board to authenticate customers and grant entry to a system with out guide intervention. This may be achieved by programming the IndusBoard, which is supplied with an ESP32 module, to interface with person identification {hardware} akin to RFID readers, biometric sensors, or keypads. When a person presents their credentials (e.g., an RFID card or fingerprint), the board processes the enter and verifies it in opposition to saved information.
If the credentials are legitimate, the IndusBoard sends a sign to the linked system to finish the login course of, enabling seamless and safe entry. This setup could be programmed utilizing the Arduino IDE to deal with the authentication logic and communication protocols.
Functions of automated login system is:
- Routinely grant staff entry to workplace premises utilizing RFID playing cards or biometric scanners, guaranteeing solely licensed personnel can enter.
- Permit owners to unlock doorways and entry good house techniques utilizing fingerprint recognition or cell authentication, enhancing house safety.
- Safe delicate areas in hospitals and clinics by granting entry to licensed medical workers by way of biometric verification.
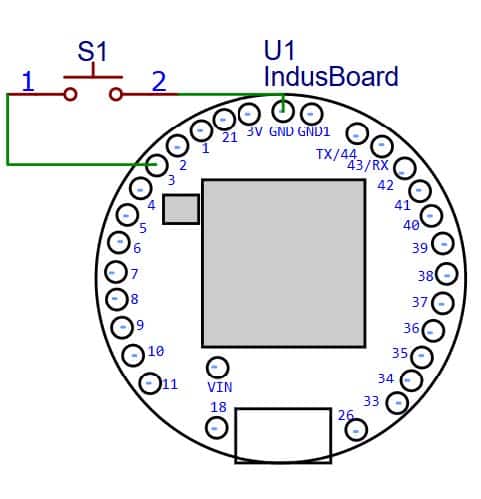
Invoice of Supplies (BoM)
| Parts | Description | Amount |
| IndusBoard Coin | 3cm sized dev board | 1 |
| Breadboard | 3.5 cm x 4.5 cm breadboard | 1 |
| Change | Pushbutton-2 Pin | 1 |
Software program Code
#if ARDUINO_USB_MODE
#warning This sketch needs to be used when USB is in OTG mode
void setup(){}
void loop(){}
#else
#embody "USB.h"
#embody "USBHIDKeyboard.h"
USBHIDKeyboard Keyboard;
const int loginButton = 3; // Button to set off the login sequence
void setup() {
// initialize the button enter:
pinMode(loginButton, INPUT_PULLUP);
// initialize the keyboard:
Keyboard.start();
USB.start();
Serial.start(115200);
}
void loop() {
// test if the login button is pressed:
if (digitalRead(loginButton) == LOW) {
loginSequence();
delay(5000); // wait 5 seconds earlier than permitting one other login
try
}
delay(5);
}
void loginSequence() {
// Substitute "YourUsername" and "YourPassword" along with your precise login
credentials
// String username = "2662002";
String password = "2662002";
typeString(password);
Keyboard.write(0xB0); // press Enter to login
}
void typeString(String str) {
for (int i = 0; i < str.size(); i++) {
Keyboard.write(str[i]);
delay(100); // add a small delay between keystrokes
}
}
#endif /* ARDUINO_USB_MODE */
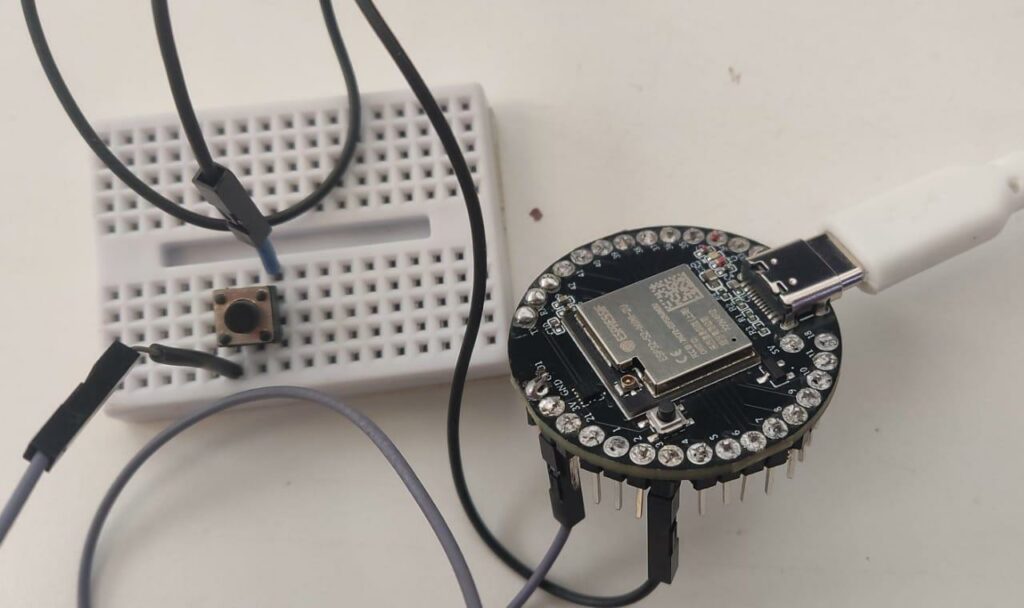
Connection
Testing
Now we join the board with the USB and add the code within the indus board, then by urgent a button, the system robotically fills within the password, unlocking the locked password or logging into any server.


Writer(s): Manjeet Vishwakarma, Abhay Verma and Satywanti Kundu are B.Tech ECE college students at GJUS&T HISAR