


Everyone knows that print is probably the most ubiquitous and helpful debugging instrument in a developer’s toolbox. Certain, we have now breakpoints too however what’s the enjoyable in that? Sprinkling some prints all through our codebase to debug an issue is far more enjoyable! And naturally after we print greater than we are able to deal with we simply add some helpful prefixes to our messages and we’re good to go once more.
What if i instructed that you are able to do method higher with just some traces of code. You may ship your prints to extra locations, give them a precedence, and extra. After all, we don’t name it printing anymore; we name it logging.
Logging is a key methodology to amassing necessary knowledge to your app. From easy debugging strings to recording whole chains of occasions, having a very good logging technique may help you debug issues whilst you’re writing your app in Xcode and likewise when you’ve shipped your app to the shop.
On this submit, I’d like to indicate you how one can arrange a Logger from the OSLog framework in your app, and the way you should utilize it to log messages that may assist you to debug your app and acquire insights about issues your customers expertise.
Establishing a Logger object
To arrange a logger object all it’s good to do is import OSLog and create an occasion of the Logger object:
import OSLog

let logger = Logger()

struct MyApp: App {
  // ...
}
This strategy creates a worldwide logger object that you should utilize from anyplace inside your app. Since I didn’t move any customized configuration, the logger will simply log messages utilizing the default parameters.
That mentioned, it’s clever to really present two items of configuration to your logger:
By offering these two parameters, you can also make filtering log messages quite a bit simpler, and it permits you to group messages from a number of loggers collectively.
For instance, I prefer to create a knowledge mannequin debugger that I can use to log knowledge mannequin associated data. Right here’s how I can create such a logger:
let modelLogger = Logger.init(
    subsystem: "com.myapp.fashions",
    class: "myapp.debugging"
)
Apple recommends that we title our subsystems utilizing reverse-DNS notation. So for instance, com.myapp.fashions for a subsystem that encompasses fashions inside my app. You could possibly create loggers for each module in your app and provides every module its personal subsystem for instance. That method, you may simply work out which module generated which log messages.
The second argument supplied to my logger is a class. I can use this class to group associated messaged collectively, even after they originated from completely different subsystems. Apple doesn’t present any naming conventions for class so you are able to do no matter you need right here.
It’s completely acceptable for a single app to have a number of loggers. You may create a number of loggers for a single subsystem for instance so as to present completely different classes. Having narrowly scoped loggers in your apps with well-named classes and subsystems will vastly enhance your debugging expertise as we’ll see afterward.
When you’ve created an occasion of your logger and located a pleasant place to carry on to it (I normally prefer to have it obtainable as a worldwide fixed however you may need to inject it or wrap it in a category of your individual) you can begin sending your first log messages. Let’s see how that works.
Logging your first messages
If you log messages by way of your logger occasion, these messages will find yourself in other places relying on which sort of log degree you’re utilizing. We’ll focus on log ranges later so for now we’ll simply use the straightforward log methodology to log our messages.
Let’s log a easy “Hey, world!” message in response to a button faucet in SwiftUI:
Button("Hey, world") {
  modelLogger.log("Hey, world!")
}
Calling log in your Logging occasion will trigger a message to be printed in your Xcode console, identical to it might with print…
Nonetheless, as a result of we’re utilizing a Logger, we are able to get Xcode to indicate us extra data.
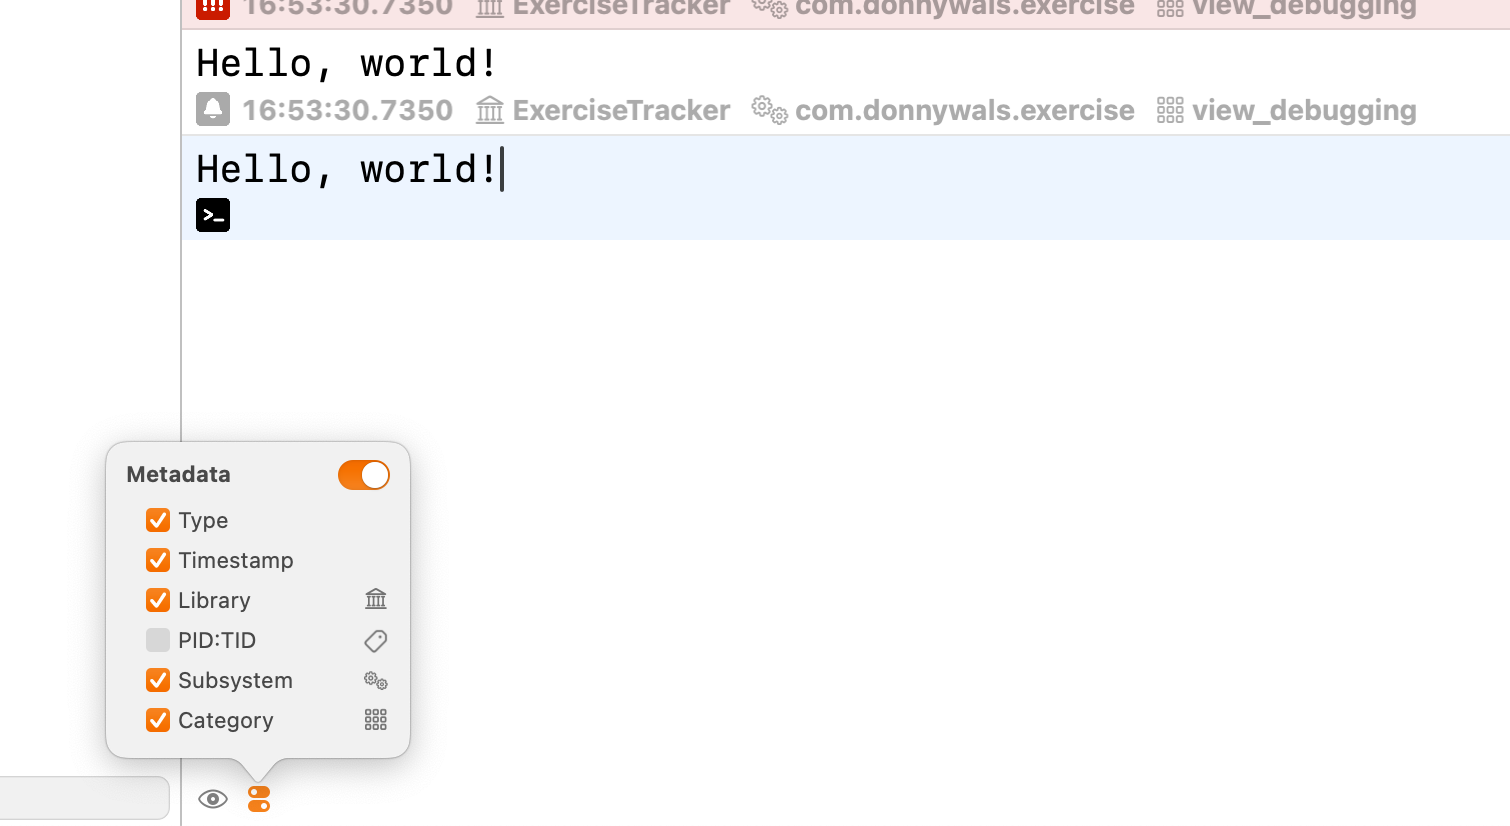
Right here’s an instance of the sorts of knowledge you may view in your console.

Personally, I discover the timestamp to be probably the most fascinating side of this. Usually your print statements gained’t present them and it may be exhausting to differentiate between issues that occurred a second or two aside and issues that occur concurrently or in very speedy succession.
For comparability, right here’s what the identical string appears like after we print it utilizing print

There’s no further data so we have now no clue of when precisely this assertion was printed, by which subsystem, and how much debugging we had been attempting to do.
Xcode gained’t present you all the knowledge above by default although. You could allow it by way of the metadata menu within the console space. The great factor is, you don’t have to have accomplished this earlier than you began debugging so you may allow that everytime you’d like.
Gaining a lot perception into the knowledge we’re logging is tremendous helpful and might actually make debugging a lot simpler. Particularly with logging classes and subsystems it’ll be a lot simpler to retrace the place a log message got here from with out resorting to including prefixes or emoji to your log messages.
If you wish to filter all of your log messages by subsystem or class, you may really simply seek for your log message utilizing the console’s search space.
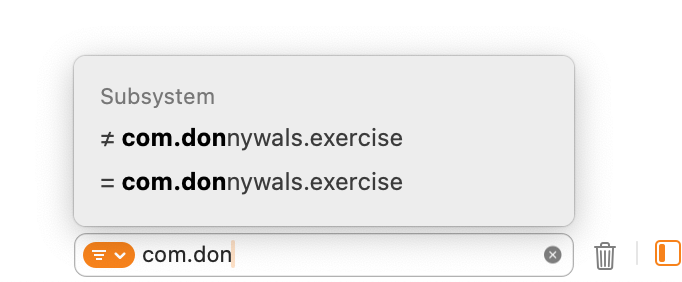
Discover how Xcode detects that I’m looking for a string that matches a recognized subsystem and it provides to both embody or exclude subsystems matching a given string.
This lets you simply drown out all of your logging noise and see precisely what you’re considering. You may have as many subsystems, classes, and loggers as you’d like in your app so I extremely advocate to create loggers which might be used for particular functions and modules when you can. It’ll make debugging a lot simpler.
Accessing logs outdoors of Xcode
There are a number of methods so that you can acquire entry to log messages even when Xcode isn’t working. My private favourite is to make use of Console app.
Discovering logs within the Console app
By means of the Console app in your mac you may connect with your cellphone and see a reside feed of all log messages which might be being despatched to the console. That features messages that you simply’re sending from your individual apps, as you may see right here:
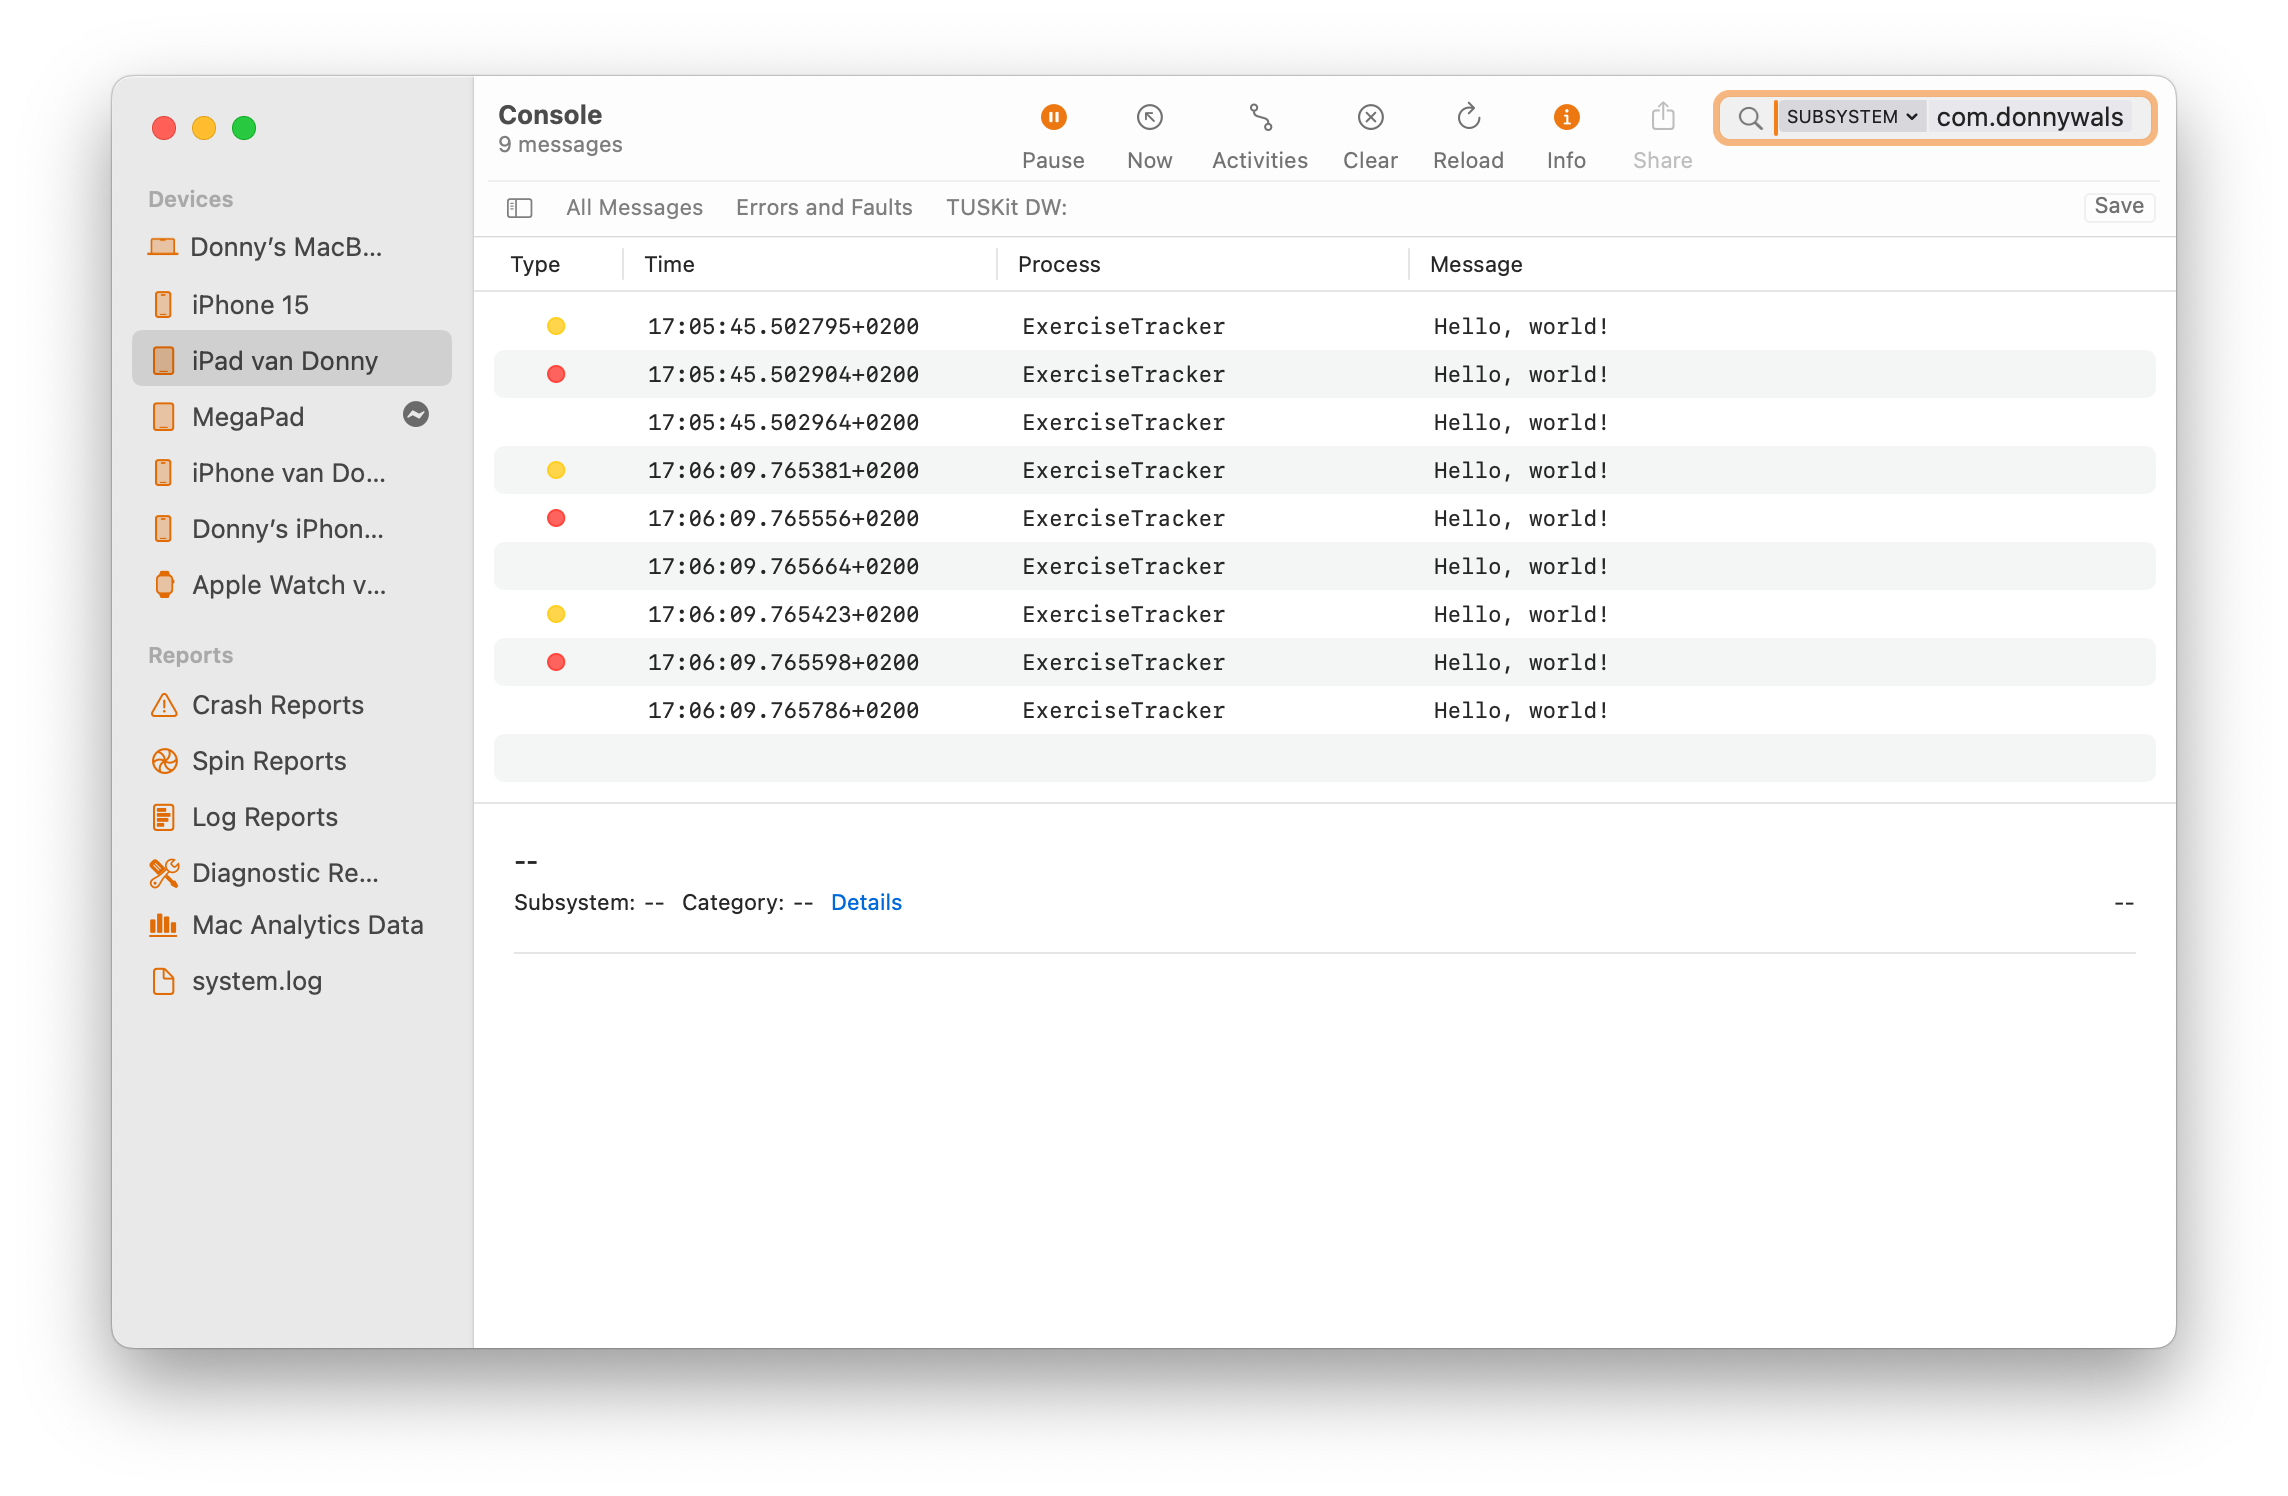
The console offers loads of filtering choices to be sure you solely see logs which might be fascinating to you. I’ve discovered the Console app logging to be invaluable whereas testing stuff that includes background up- and downloads the place I might shut my app, pressure it out of reminiscence (and detach the debugger) so I might see whether or not all delegate strategies are referred to as on the proper occasions with the anticipated values.
It’s additionally fairly helpful to have the ability to plug in a cellphone to your Mac, open Console, and browse your app’s logs. Inside an workplace this has allowed me to do some tough debugging on different individuals’s units with out having to construct straight to those units from Xcode. Very quick, very helpful.
Accessing logs in your app
If that you simply’d like to have the ability to obtain logs from customers so as to debug points with full entry to your log messages, you may implement a log viewer in your app. To retrieve logs from the OSLog retailer, you should utilize the OSLogStore class to fetch your log messages.
For instance, right here’s what a easy view appears like that fetches all log messages that belong to subsystems that I’ve created for my app:
import Basis
import OSLog
import SwiftUI

struct LogsViewer: View {
    let logs: [OSLogEntryLog]

    init() {
        let logStore = strive! OSLogStore(scope: .currentProcessIdentifier)
        self.logs = strive! logStore.getEntries().compactMap { entry in
            guard let logEntry = entry as? OSLogEntryLog,
                  logEntry.subsystem.begins(with: "com.donnywals") == true else {
                return nil
            }

            return logEntry
        }
    }

    var physique: some View {
        Listing(logs, id: .self) { log in
            VStack(alignment: .main) {
                Textual content(log.composedMessage)
                HStack {
                    Textual content(log.subsystem)
                    Textual content(log.date, format: .dateTime)
                }.daring()
            }
        }
    }
}
It’s a reasonably easy view however it does assist me to acquire saved log messages moderately simply. Including a view like this to your app and increasing it with an choice to export a JSON file that comprises all of your logs (primarily based by yourself Codable fashions) could make acquiring logs out of your customers a breeze.
Logging and privateness
Typically, you may need to log data that might be thought of privateness delicate in an effort to make debugging simpler. This data won’t be required so that you can really debug and profile your app. It’s a good suggestion to redact non-required private data that you simply’re amassing when it’s being logged on consumer’s units.
By default, while you insert variables into your strings these variables shall be thought of as knowledge that needs to be redacted. Right here’s an instance:
appLogger.log(degree: .default, "Hey, world! (accessToken)")I’m logging an entry token on this log message. After I profile my app with the debugger hooked up, all the pieces I log shall be printed as you’d count on; I can see the entry token.
Nonetheless, while you disconnect the debugger, launch your app, after which view your logs within the Console app whilst you’re not working your app by way of Xcode, the log messages will look extra like this:
Hey, world! The variable that you simply’ve added to your log is redacted to guard your consumer’s privateness. Should you contemplate the knowledge you’re inserting to be non-privacy delicate data, you may mark the variable as public as follows:
appLogger.log(degree: .default, "Background standing: (newStatus, privateness: .public)")On this case I would like to have the ability to see the standing of my background motion handler so I have to mark this data as public.
Notice that whether or not or not your log messages are recorded when the debugger isn’t hooked up will depend on the log degree you’re utilizing. The default log degree will get persevered and is on the market in Console app while you’re not debugging. Nonetheless, the debug and data log ranges are solely proven when the debugger is hooked up.
Different log ranges which might be helpful while you need to be sure you can see them even when the debugger isn’t hooked up are error and fault.
If you’d like to have the ability to observe whether or not privateness delicate data stays the identical all through your app, you may ask the logger to create a hash for the privateness delicate worth. This lets you guarantee knowledge consistency with out really figuring out the content material of what’s being logged.
You are able to do this as follows:
appLogger.log(degree: .default, "Hey, world! (accessToken, privateness: .non-public(masks: .hash))")This lets you debug knowledge consistency points with out sacrificing your consumer’s privateness which is very nice.
In Abstract
Having the ability to debug and profile your apps is important to your app’s success. Logging is a useful instrument that you should utilize whereas growing your app to interchange your commonplace print calls and it scales superbly to manufacturing conditions the place you want to have the ability to get hold of collected logs out of your consumer’s units.
I extremely advocate that you simply begin experimenting with Logging immediately by changing your print statements with debug degree logging so that you simply’ll be capable of apply higher filtering and looking out in addition to stream logs in your macOS console.
Don’t overlook you could make a number of Logger objects for various components of your app. Having the ability to filter by subsystem and class is extraordinarily helpful and makes debugging and tracing your logs a lot simpler.